I first back combed the crown of her head. Then take a small amount of hair from the front of her head and twist it. Do this to both sides and secure with an elastic.
Hooray for spring!! I love this time of year & the beautiful weather with all the blooming flowers. But it looks like it's not going to last for long because we are getting some rain this week. Of course over Easter weekend. Here's my new post:
These braids are SO easy & you can really end the hair any way you want. We wore it like this on Sunday but kept it all down, or you could do 2 pig tails or you could do half up half down. So many ways. This was the fastest way for me today

 Part your hair on the regular parted side. Start a braid by sectioning off just a small section at the front of the head (off the part)
These braids are SO easy & you can really end the hair any way you want. We wore it like this on Sunday but kept it all down, or you could do 2 pig tails or you could do half up half down. So many ways. This was the fastest way for me today

 Part your hair on the regular parted side. Start a braid by sectioning off just a small section at the front of the head (off the part)
Start a 3 piece braid, then add ONLY a piece from the top & add to the braid. Everytime you get back to that part - add JUST from the top.
 Here's what it looks like: Add an elastic at the base of the braid. On Sunday, I kept braiding (without taking any pieces - regular old braid to finish it) & brought all braids together but do what ever is easiest/fastest for you.
 Get your next section just right near the first braid & do the same thing. You will notice you won't have to braid as far because you are starting back just a tinch further back.
 I did it 3 times on this side. You can see my spacing isn't the best - so maybe space yours a little better.
 Same thing on the other side - only doing 2 braids since there's not as much room on that side of part. Then I brought all the hair together to a side pony & pulled it into a bun.
 Spray to hold, add a bow & you are finished. My bow is from Kyla's Kreations. Check her site out if you are looking for some new, fun bows. Her link is on the right under my lists. Again, like I said - you can finish this however you want. I wanted to leave it down & curl her hair but it was not in our time - but that's what is great you can always modify!!
 Here's what it looks like: Add an elastic at the base of the braid. On Sunday, I kept braiding (without taking any pieces - regular old braid to finish it) & brought all braids together but do what ever is easiest/fastest for you.
  Get your next section just right near the first braid & do the same thing. You will notice you won't have to braid as far because you are starting back just a tinch further back.
 I did it 3 times on this side. You can see my spacing isn't the best - so maybe space yours a little better.
 Same thing on the other side - only doing 2 braids since there's not as much room on that side of part. Then I brought all the hair together to a side pony & pulled it into a bun.
  Spray to hold, add a bow & you are finished. My bow is from Kyla's Kreations. Check her site out if you are looking for some new, fun bows. Her link is on the right under my lists. Again, like I said - you can finish this however you want. I wanted to leave it down & curl her hair but it was not in our time - but that's what is great you can always modify!!
Chic & Carefree
Toddler Sides pulled up
Since my toddlers hair is still short I pulled back a small ponytail of bangs so the hair would stay back all day. Then I took the sides and pulled them back and secured it with an elastic.
I flipped the bottom up and then curled the rest of her hair under to give her some volume. I also back combed just under the ponytail.
Below is a side view.
Nothing Fancy but Cute Toddler
My toddler has the straightest hair so in order to get this look I first blow dried it. Then I took a small curling iron and flipped the bottom up and then curled the top downward. To give it a little body I back combed the top.
Short and Sweet
Poof and 2 Rolls
Start by making a poof that goes towards the right side. I secured it with bobbie pins
Next I made 2 small rolls on the left side going the same direction as the poof.
Then make 2 small rolls on the right side. I secured these with bobbie pins too.
Below is just a picture of the top of her head.
Fun Up Do
I started by making a few parts along the front and sides of her hair as shown below in the next 4 pictures
I put the remaining center hair into an elastic.
Below is the parts on the right side of her head.
Below is the parts on the left side of her head.
Next I took the hair on her right side above her ear and wrapped it around the ponytail.
Then I took the hair on the front of her head and rolled it as shown below then I wrapped it around her ponytail.

On the left side I took her bangs and swooped them toward the side before I started rolling that hair and securing it around the ponytail as well.
Then roll the hair just above her ear and attach it to the ponytail.
I used bobbie pins to make the messy bun lay flat to her head. I also added a pink ribbon that I wrapped around the ponytail and tied in a bow at the bottom.
Toddler Headband

This was simple easy and very cute. All I did was make a puffy braid around the front of her head
I started on a far lateral part.
Then made my way down the left side of her head taking small amounts of hair until I got to the bottom center of her head.
Then I did the same thing down the right side of her head until I met the other end of the puffy braid and attached them together under the rest of her hair.
Toddler Twist Pigtails.
First I made center part to seperate for her pigtails. Then I made a small ponytail and flipped it through itself. Then make a 2nd small ponytail.
Then take the hair from the bottom of her head and make a small ponytail going up then make a 2nd small ponytail like puffy braids.
Then pull all the hair together for the finally pigtail. Do the same to the other side.
Toddler Ribbon Headband
She is the hardest to get pictures of so sorry about the angles and views. Everytime I pull the camera out my 2 year old runs, hides, or crys.
So to explain a little I made a front row of small ponytails 4 across her hairline.
Then I made similar to a puffy braid behind each of the 4 ponytails shown above.
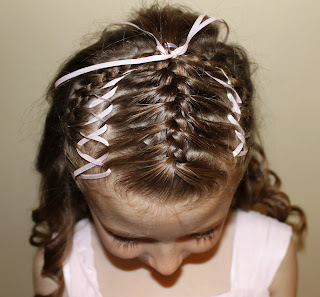
Then I took a ribbon and pulled it through the center of the ponytails.
Then I secured the ribbon at her neck line.
Braids, Ringlets, and Ribbons
Everyday my daughter asks for full body pictures while I am trying to take hair pictures I told her I would post this full body picture for her.
Start by making your 3 french braids across the front of her head as shown in previous posts.
Then make ringlets in all of her hair.
Take a small ribbon and weave it in and out of her braids on both sides. Tie the ribbons around the ponytail.
Below is the top view of her hair.
For the ringlets I used this curling iron below it saves me so much time and the ringlets stay in all day.
Subscribe to:
Comments (Atom)


